In this article, we will create a simple automation using Zapier to create tasks in Hailer based on certain trigger
Checklist before starting:
- Hailer account
- Zapier account
- Make sure you have Admin permissions in the workspace or at least in the processes you are going to use for automation
The goal is to create an automation that will create an activity in the "Sales activities" workflow when an activity in the "Sales pipeline" workflow is moved to the "Waiting for decision" phase
Create a workflow
We will be using our prebuilt CRM workflow for this example, you don't necessarily have to use the same one. These steps can be applied to several types of workflows.

Now that you have created a CRM workflow, or decided which one of your workflows you will be using for this automation. Go to workflow settings
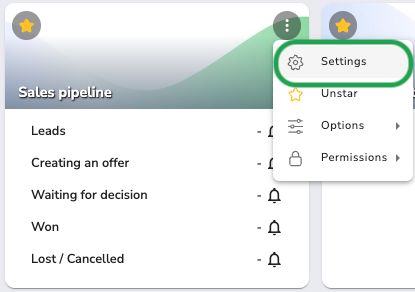
In the settings, we will jump to the "Fields" -tab and create a new field
Preparations and field mapping in Hailer
Create a date field called "Offer sent" and make it visible only in the "Waiting for decision" phase"

We will be using this later on in the function configuring and setting the deadline for our Sales activity. Set it as "Required" and "Default to current date"
After that create another field, this time a text area field.
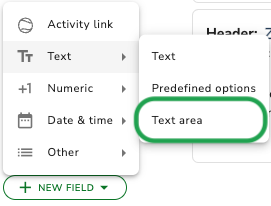
Create a new text area type of field and check the "Function field" box

We will be using this text area field as a field map for the Zapier automation, it will be created by adding dependencies and a short code block in the function editor.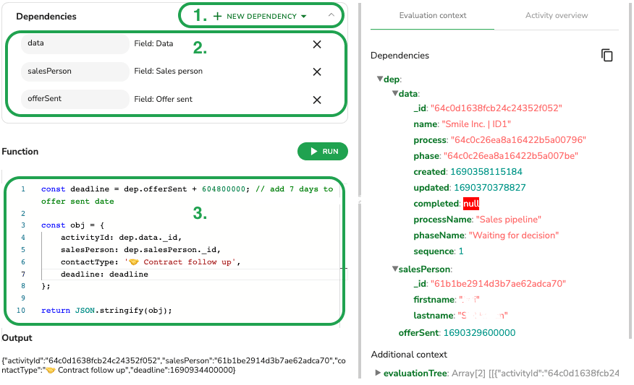
1. Choose the dependencies for the fields and their values you would like to use for your automation.
2. Re-name dependencies if needed. In this case, we have renamed them.
3. Code block (below) where we define what properties the object should contain and what their value would be. As for activityId and salesPerson we use values that can change per Sales pipeline activity but for the contactType we want to use the hard-coded value "🤝 Contract follow up" as it will be the type of Sales activity we want to create and it is a value for a required field in our destination workflow.
In addition to this, we can modify our values by adding some calculations there. For example, we could decide that we want to fill in the 'deadline' field as well even though it is not required in our destination process.
Now we probably don't want to have the deadline to be exact same date as the offer was sent, we can use simple math to add more days to it. Here's an example code block including the date for the deadline. In our case we decided to add 7 days there, which equals to 604800000.
const deadline = dep.offerSent + 604800000; // add 7 days to offer sent date

const obj = {
activityId: dep.data._id,
customerId: dep.customerData._id,
salesPerson: dep.salesPerson._id,
contactType: '🤝 Contract follow up',
deadline: deadline
};

return JSON.stringify(obj);
Remember, to check what fields or information is set as required in your destination workflow, and make sure you remember to add those values to the field map
Zapier time!
Once you've logged in to Zapier you will see a "Create Zap" button at the top left corner.
We will use "Webhooks by Zapier" as our trigger for this automation.

The event should be "Catch Raw Hook" for our purposes, once you've selected that and hit continue, Zapier will provide you a unique webhook URL. Copy this URL and jump back to Hailer.
Now in Hailer go to the Sales pipeline workflow settings as you did before, but this time we will go to the Phases -tab.
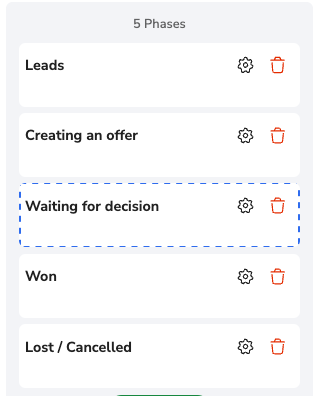
Select the phase you want to use for triggering the automation. In this case, we will be using the "Waiting for decision" phase. Scroll down all the way to the bottom and you will see the "Webhooks" section.

If you do not see the "Webhooks" section, contact info@hailer.com for more details and possibilities for upgrading your Hailer workspace
Reading the webhook data in Zapier
After you've set the webhook URL, go to your workflow and move an example activity to your trigger phase. After this is done, go back to Zapier and hit the "Test trigger" button.
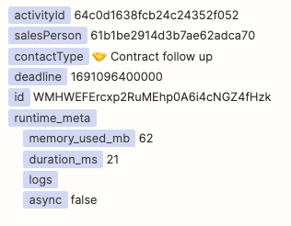
If the test is successful you should receive a request.

It should look something like this. If you received a record, hit continue.
Create another step in your Zap, this time we will use the "Code by Zapier" action.
For the Event, use "Run Javascript".

To the Input data field, write 'data' and then select the Raw body object from the previous step.
Here's the code block you can use in the Zapiers Code part.
let data = JSON.parse(inputData.data);
let fields = data.fields; let obj = {};

fields.forEach(item => {
 if (item.id === 'ZapHelperFieldId') { // replace ZapHelperFieldId with actual fieldId
 obj = JSON.parse(item.value)
 }
});

return obj;
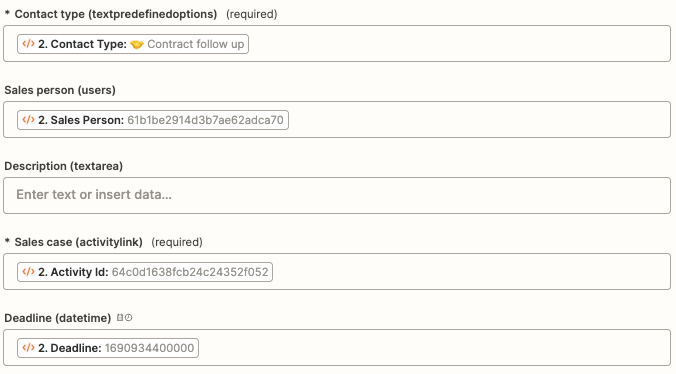
After that, hit continue and test your Zapier step.
Your results should look something like this:
Create a task in Hailer with Zapier
For the next Zapier action, search for "Hailer"

You can use anything with the number 2.7.1 or higher.
Once you have chosen the connector, you set up the Event for it.
In this case, select "Create/Update Activity" from the dropdown selection.
After that, you log in with either your own Hailer account or a dedicated integration user account.
Make sure that the account you are using for integration has permissions set up for the destination workflow
Setting up the Sales activity field data
Next, we set up which network, process, and phase we will be inputting our data
As we are using function fields for our activity name in the Sales activities workflow in Hailer, you can just use any output for that field, and Hailer will take care of the naming rules.
After you have set values to each field, it is time to test the action.
If test is successful, you now have a linked activity in your Sales activities workflow
